
6 min read
Jun 23, 2026

A prehung exterior door is a complete unit that ships with the slab already mounted inside its jamb, with hinges attached and the strike plate pre-mortised. Because the door, frame, and hinges arrive as one assembly, the job is mostly about preparing and sealing the rough opening correctly, not fitting individual parts.
Expect the job to take about 3 to 4 hours for an experienced DIYer. Difficulty is intermediate – the unit is heavy and sensitive to an out-of-square opening. DIY materials typically run $300 to $800, and in New Jersey and Pennsylvania, a professional install usually falls between $400 and $1,200 in labor, depending on the wall construction and whether framing repairs are needed.

The standard rule for a prehung exterior door rough opening is the door’s nominal width plus 2 inches and the nominal height plus 2 to 2.5 inches. That extra space gives you room to shim the unit plumb and square inside an imperfect framed opening. Handedness is determined by standing inside the house, facing the door: if the hinges are on your right and the door swings in, it’s a right-hand inswing; if the hinges are on your left and the door swings in, it’s a left-hand inswing. Outswing is labeled the same way but with the door swinging away from you.
The tool list for a prehung exterior door install is standard carpentry gear plus accurate leveling equipment. A prehung unit is sensitive to a frame that’s even slightly out of plumb, so the levels do most of the quality control work on this job.
Having every tool laid out before you start matters more than it seems. Once the old door is off and the opening is exposed, you don’t want to leave the house weather-open while you drive to the hardware store for a missing drill bit or a second level.
The material list splits into two jobs: holding the door in place and keeping water out. The structural materials (unit, screws, shims) get the door aligned and anchored; the weatherproofing materials (sill pan, flashing, foam, caulk) are what determine whether the install lasts decades or fails within a few years.
Don’t substitute interior-grade products for exterior-rated ones, and don’t swap low-expansion foam for standard spray foam. Both shortcuts are common and both show up as visible defects – drafts, stuck doors, or water stains – inside the first couple of years.
Before ordering a door, measure the existing rough opening or confirm the new framing against standard sizes. The table below covers the most common prehung exterior doors for residential homes and the matching rough opening dimensions.
|
Door Size |
Rough Opening (W × H) |
|
30″ × 80″ single |
32″ × 82.5″ |
|
32″ × 80″ single |
34″ × 82.5″ |
|
36″ × 80″ single |
38″ × 82.5″ |
|
60″ × 80″ double (30″ + 30″) |
62″ × 82.5″ |
|
72″ × 80″ double (36″ + 36″) |
74″ × 82.5″ |
These are standard framing dimensions for a 2×4 wall with typical jamb thickness. Confirm the manufacturer’s spec sheet for your specific door before cutting or reframing, since jamb depth and sill thickness vary slightly between brands. If the existing opening is undersized, you’ll need to reframe with new trimmer studs and a resized header; if it’s oversized, build it down with ripped lumber rather than relying on extra-wide shims.
The installation breaks down into five steps: prepare the rough opening, install the sill pan and flashing, set and shim the door, fasten the frame with screws, and seal and verify. Each step depends on the previous one, so skipping ahead almost always shows up as a draft, a misaligned reveal, or water damage within the first few years.
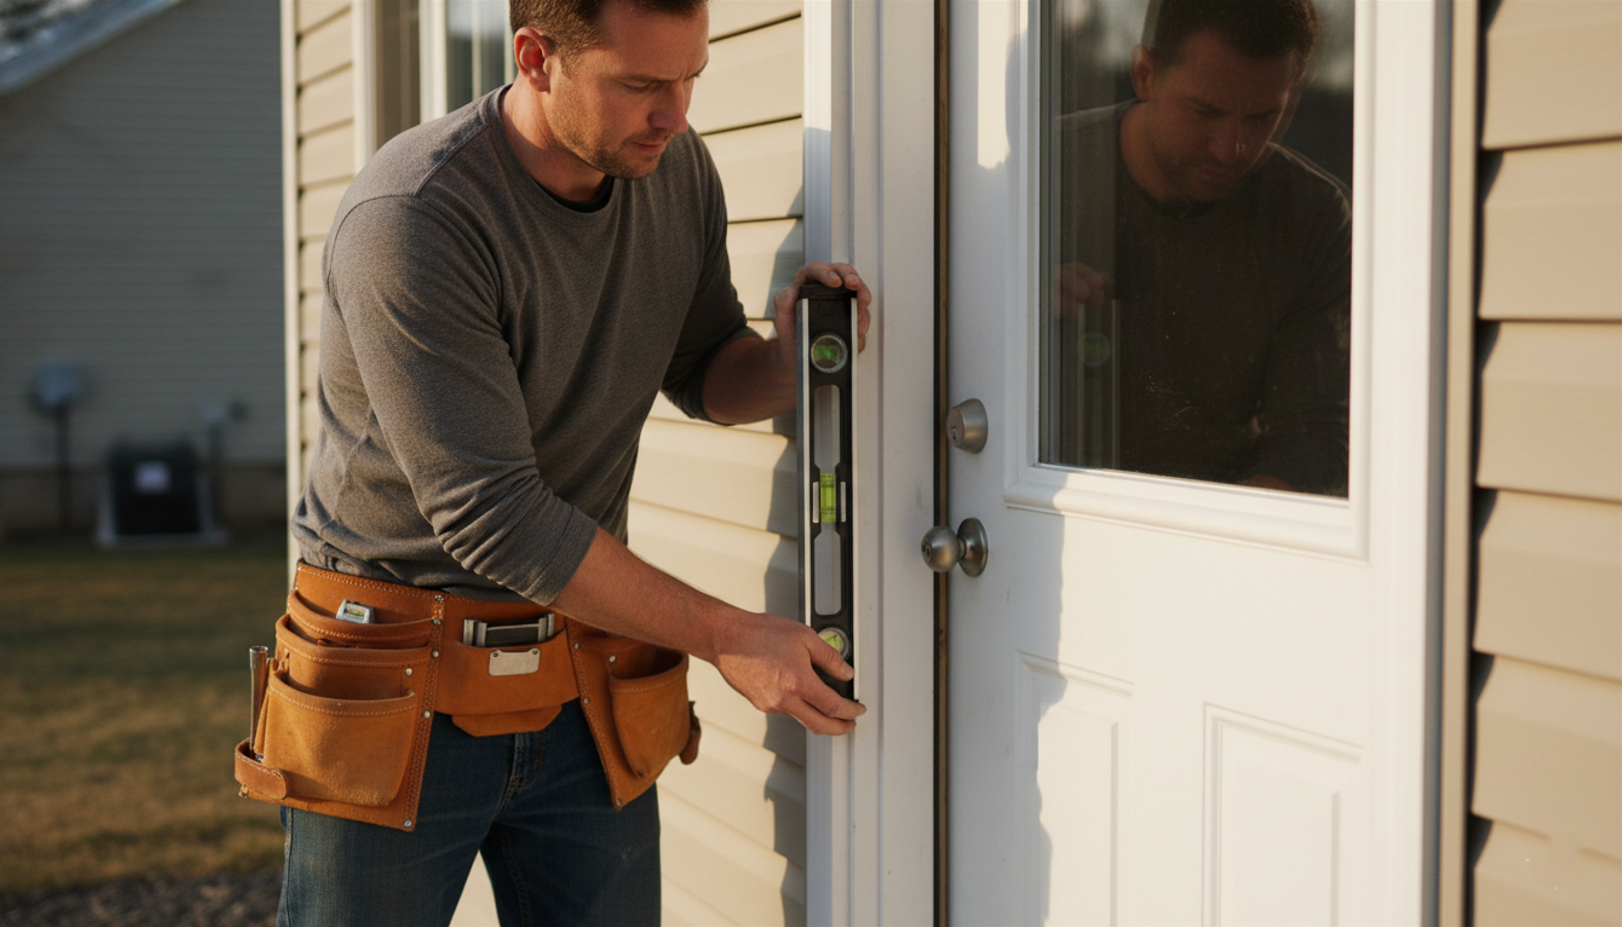
Before the new door touches the opening, the framed hole has to be level, plumb, and square. Place the 4-foot level across the subfloor inside the opening – if the bubble is off, plane high spots or shim low spots so the sill pan will sit flat. Then run the level vertically against both king studs to confirm they are plumb in both the wall plane and across the wall thickness.
Check the square by measuring diagonally from corner to corner. The two measurements should match within 1/8 inch. If they’re off by more than that, the door will bind against the jamb on one side. Correct it by adjusting the trimmer studs or the header before moving on.
Cut the water-resistive barrier (WRB) flush at the sill so water can drain outward, and leave roughly an inch of WRB exposed on the sides and top to integrate later with flashing tape. Tape any accidental cuts or tears. Sweep the opening clean of old caulk, insulation, loose nails, and debris.
The sill pan is the single most important weatherproofing component in an exterior door installation. It catches any water that gets past the exterior sealant and redirects it outward before it reaches the subfloor. Skipping it is the main cause of rotted sills and soft floors two to five years after a door replacement.
Set the sill pan tight against the wall sheathing with the back dam facing inside the house. Under the pan, lay three continuous beads of exterior-grade sealant: one along the back where the pan meets the interior floor, one across the middle, and one along the front edge of the subfloor. Press the pan into the sealant so the beads flatten and fill gaps.
Now apply flashing tape in shingle fashion, meaning each upper layer overlaps the one below so water runs down and out, not into a seam. Tape the sides of the rough opening first, lapping the tape onto the sill pan flange and up the sides of the opening by at least 9 inches. The head flashing tape goes on last, above the door after it’s installed, lapping over the side flashing and tucked under the WRB at the top.
With the opening dry and sealed, dry-fit the prehung unit. From the exterior side, tilt the bottom of the jamb into the opening first, then rotate the top up into place. Center the unit left-to-right in the opening so the reveals on both sides look roughly equal.
Start with the hinge-side jamb. Hold a 4-foot level against the face of the jamb and check plumb in two directions – both across the door’s swing and across the wall’s thickness. Insert a pair of tapered shims (one from each side meeting in the middle) behind each hinge, through the gap between the jamb and the trimmer stud, until the jamb reads plumb. Three hinges means three shim pairs on the hinge side.
Move to the strike side. Shim at the top, at the strike plate location, and near the bottom. As you shim, keep the reveal – the visible gap between the door slab and the jamb – at a consistent 1/8 inch along the top and both sides. Don’t remove any shipping brackets or factory clips yet; they hold the slab in position while you work.
Use #8 2-1/2-inch wood screws, not nails. Screws allow fine adjustment if the jamb needs to shift, hold better over time as the door cycles, and don’t loosen from seasonal movement the way nails do. Predrill through the jamb at each shim location to prevent the wood from splitting.
Fasten the hinge side first. Drive one screw at each shim pair, through the jamb, through the shims, and into the trimmer stud behind. Then remove one of the original short hinge screws from each hinge and replace it with a 3-inch screw that reaches past the trimmer and bites into the king stud. That single modification is what prevents the door from sagging over the years.
Move to the strike side. Drive screws through the jamb at the top, at the strike plate (either just above or just below the strike), and near the bottom – all through the shims into the framing. Do not overtighten. If a screw pulls the jamb inward past flush with the shim, the jamb will bow and throw off the reveal you just set. Tight is good; crushed is not.
Open and close the door. It should swing freely, latch without lifting, and sit with an even gap. If not, back the nearest screw off and adjust shims before continuing.
Fill the gap between the jamb and the rough framing with low-expansion spray foam – the kind labeled for doors and windows. Standard (high-expansion) foam expands hard enough to bow the jamb inward, which causes binding and a crooked reveal after everything was set correctly. Apply a thin bead; it will grow to fill the cavity.
On the outside, run a continuous bead of exterior caulk where the brick molding or exterior trim meets the siding along the top and both sides. Leave the bottom uncaulked, or leave a small weep gap there, so any water that reaches the sill pan can drain out. Install a rigid drip cap (head flashing) over the top of the brick molding and tuck the vertical leg behind the WRB, then seal the joint with flashing tape.
Adjust the sill sweep using the dollar-bill test: close the door on a dollar bill at several points along the sill and pull. You should feel steady friction without tearing the bill. If it slides out easily, raise the sill’s adjustment screws; if the bill tears, lower them.
Before calling the job done, run a final check:
If all five pass, the install is finished.
Not every prehung door install is a reasonable DIY project. Some conditions add enough complexity, risk, or weight that hiring a pro is the better call even for confident DIYers. The situations below are the most common reasons homeowners stop a planned DIY install partway through and bring in an installer.
If you pull the old door and find soft wood, dark staining, or evidence of termite activity in the sill, trimmer studs, or header, the job is no longer a door install – it’s a framing repair first. Setting a new prehung unit into compromised framing guarantees the problem comes back, because the fasteners won’t hold and the weatherproofing won’t seal to degraded wood. A professional can scope the damage, replace the affected framing, and install the new door on a sound structure in one visit.
Fastening and flashing a prehung door into a wood-framed wall is one job; doing the same into brick, stone, block, or stucco is a different one. The fastener types, the buck framing inside the masonry opening, and the flashing details around the brick mold are not interchangeable with wood-wall techniques. Water management in particular is unforgiving on a masonry opening – improper flashing traps moisture against the back of the wall and the sill.
If the existing opening doesn’t match any standard prehung size, the installation includes a framing alteration. That can mean adding a new trimmer and resizing the header for a smaller door, or widening the opening and replacing the header with a longer one for a larger door. Both involve load-path decisions that should be done by someone who understands residential framing – a miscalculated header is a structural problem, not a cosmetic one.
Historic houses often have wall thicknesses, jamb depths, and trim details that no off-the-shelf prehung unit matches. The same applies to any entry with a transom above, sidelites on one or both sides, or an arched top. These units are usually ordered custom to the opening, and installing them requires careful sequencing to keep the combined assembly square, plumb, and weathertight across the full opening.
A solid-wood or fiberglass exterior door with real insulation and hardware can weigh well over 100 pounds as a complete prehung unit. Tilting that weight into a rough opening and holding it plumb long enough to shim and fasten is a two-person job at minimum. Attempting it alone leads to dropped units, damaged jambs, and injuries – and hiring an installer for an afternoon is cheaper than replacing a damaged door or dealing with a back injury.
In New Jersey and Pennsylvania, American Quality Remodeling handles prehung exterior door installation across both states, including in situations where framing, flashing, or weatherproofing needs attention beyond a straight swap. Details on scope and service areas are on the door installation page.


Embark On Your Build With Us!
we will be in touch with you soon
