
13 min read
Apr 27, 2026
Find the best sealant for metal roof screws by comparing silicone and butyl options, understanding key performance properties, and learning how to apply sealant correctly for a durable, watertight seal.

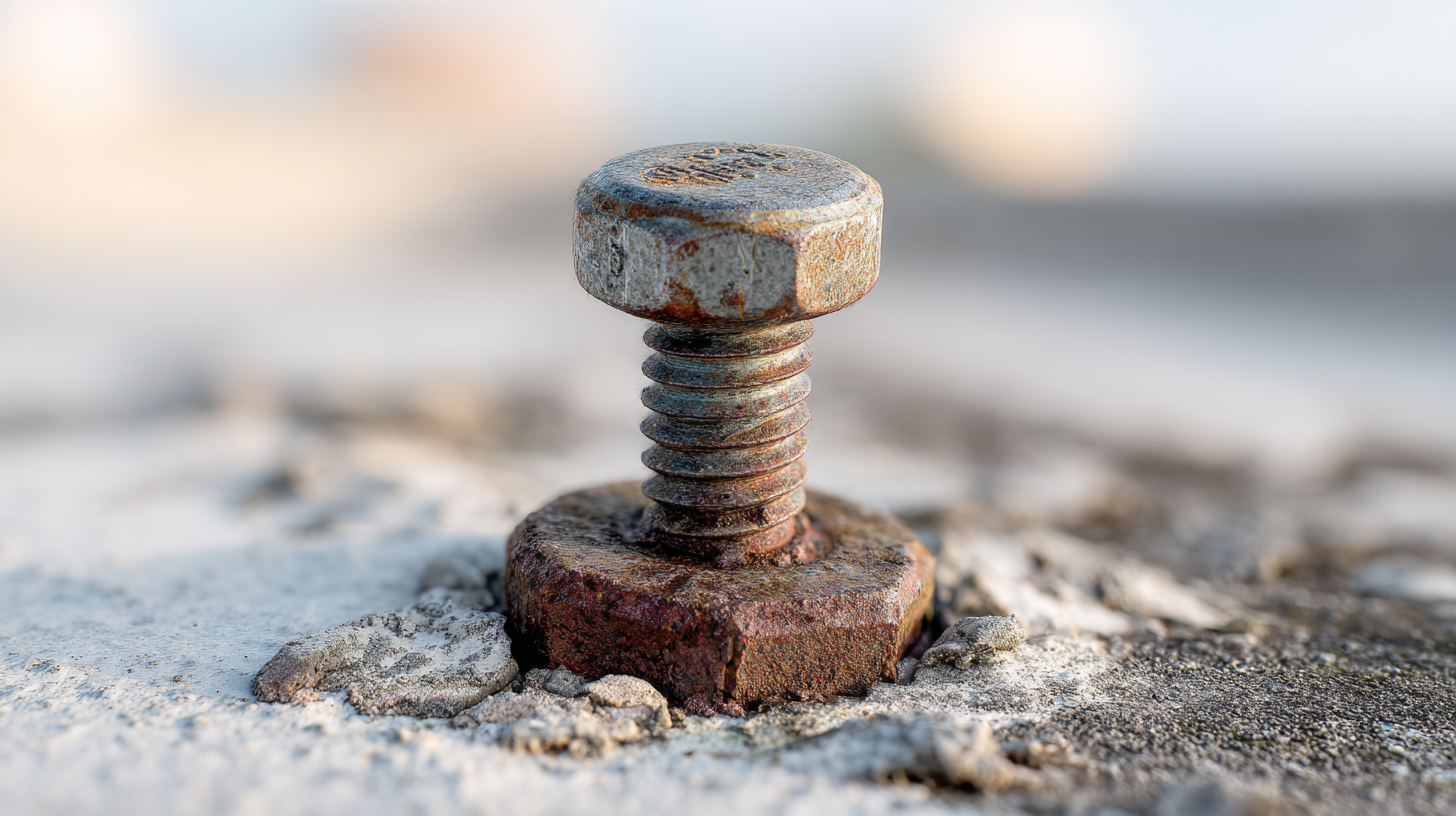
For metal roof screw penetrations, silicone sealant is the most widely recommended choice – it maintains adhesion to metal through thermal expansion and contraction cycles, resists UV degradation, and seals against moisture at the point of penetration. Butyl tape is the correct alternative when screws have not yet been driven, as it creates a compression seal before fastening. The choice between the two depends on three factors: whether the installation is new or existing, the climate temperature range of the region, and the type of coating on the metal panel.
Each screw driven through a metal roofing panel creates a point penetration that expands and contracts with every temperature cycle. The metal panel moves independently of the screw shank – expanding outward in heat and contracting in cold – which generates shear stress at the point where the sealant contacts both surfaces. A sealant that lacks sufficient flexibility will crack or debond at that point within 2 to 5 years.
General-purpose joint sealants are formulated for static gaps between materials that move minimally or in the same direction. A screw penetration is a dynamic point load: the panel moves laterally while the screw remains fixed. Applying a rigid or low-elasticity sealant to this type of joint does not fail gradually – it separates cleanly at the metal-to-sealant interface, leaving the penetration fully exposed.
An unsealed or failed screw penetration allows water to enter through capillary action – the gap between the screw shank and the panel is narrow enough that surface tension draws water upward and inward even without direct pressure. Once inside, water contacts the metal decking or wood sheathing beneath the panel, accelerating corrosion around the screw and causing moisture damage to the roof structure below.
A sealant for metal roof fasteners must meet five technical criteria. Each criterion addresses a specific type of stress that occurs at the screw penetration point – failing any one of them results in premature sealant failure regardless of brand or price.
|
Property |
Why It Matters for Screws |
|
Adhesion to metal |
Stays bonded under mechanical stress at the fastener point |
|
Flexibility / elasticity |
Accommodates thermal expansion without cracking |
|
UV resistance |
Exposed screw heads accelerate UV degradation of non-resistant sealants |
|
Moisture cure compatibility |
Must seal even when applied in humid or damp conditions |
|
Compatibility with coated metals |
Kynar, galvanized, and painted surfaces require specific formulations |
The required level of elasticity increases with the temperature range of the region. In New Jersey and Pennsylvania, where temperatures can swing from below 0°F in winter to above 95°F in summer, a sealant with a rated flexibility range of at least -60°F to +300°F is appropriate. In regions with minimal temperature variation, a standard acrylic sealant may be sufficient – but it is not appropriate for the Mid-Atlantic climate.
Compatibility with the panel coating is a criterion that is frequently overlooked at the point of purchase. Kynar-coated panels, galvanized steel, and painted aluminum each have surface chemistries that affect sealant adhesion differently. A silicone sealant rated for bare metal may not bond correctly to a Kynar finish without a primer. The sealant product specification sheet – not the general label – is the correct source for compatibility information.
Three sealant types are appropriate for metal roof screw penetrations: silicone, butyl (in tape or paste form), and acrylic. Polyurethane sealant is not recommended for this application. Each suitable type performs correctly within a specific set of conditions; selecting outside those conditions accelerates failure.
Silicone is the most widely used sealant for re-sealing existing metal roof screws. It bonds directly to metal surfaces without primer in most cases, remains flexible across a temperature range of -60°F to +400°F, and does not crack under repeated thermal cycling. Its primary limitation is that cured silicone cannot be painted – if color-matching to the panel is required, silicone is not compatible with that requirement.
Butyl tape is the correct choice during new panel installation, before screws are driven. The tape is placed around the screw hole or along the panel edge, and the screw is driven through it, compressing the butyl material against both the panel and the washer. This creates a gasket-type seal rather than a surface-applied coating. Butyl tape cannot be effectively applied to an existing screw penetration because it requires compression from the fastener to seal correctly.
Acrylic sealant is acceptable for screw penetrations in climates with low daily and seasonal temperature variation – typically southern or coastal regions where freezing temperatures are rare. In colder climates, acrylic loses elasticity at low temperatures and cracks at the penetration point within one to three heating-cooling seasons.
Polyurethane sealant is not recommended for bare or coated metal surfaces without a primer. At temperatures below freezing, polyurethane stiffens significantly and loses the flexibility needed to follow metal panel movement. Without a compatible primer, it also fails to form a lasting bond to metal, making it unsuitable for this application even when a primer is used.
Silicone sealant and butyl tape are the two correct options for metal roof screw penetrations, but they are not interchangeable – each is designed for a different stage of the roofing process. The decision between them is determined by a single factor: whether the screw is already installed or not yet driven.
|
Silicone Sealant |
Butyl Tape |
|
|
Best for |
Re-sealing existing screws |
New panel installation |
|
Application timing |
After screw is driven |
Before screw is driven |
|
Adhesion to coated metal |
High (surface bond) |
High (compression bond) |
|
UV resistance |
Excellent |
Good |
|
Paintable after cure |
No |
No |
|
Temperature range |
-60°F to +400°F |
-20°F to +200°F |
|
DIY-friendly |
Yes – caulk gun application |
Yes – peel-and-stick |
The practical rule is: if the screw is already in place, use silicone. If the screw has not yet been driven, use butyl tape. Applying silicone to a newly installed screw is acceptable but less effective than butyl at the compression point – silicone creates a surface seal around the screw head and washer, while butyl creates a seal inside the joint under mechanical pressure.
When neither option is sufficient – for example, when screws are corroded through, panel holes are oversized from repeated re-fastening, or panels are deformed at fastener points across a large area – re-sealing is not the correct repair. In those cases, the panels and fasteners need to be repositioned or replaced before any sealant is applied.
Applying sealant to existing metal roof screws follows four steps. Surface preparation is as significant as product selection – sealant applied to a contaminated or damp surface will not bond correctly, regardless of its rated specifications.
Wipe the area around each screw head with isopropyl alcohol. Remove all dirt, oxidation, and residue from the previous sealant if re-sealing. Allow the surface to dry completely before applying new sealant.
Check whether the screw is tight. A screw that has backed out – even partially – will not hold a sealant seal under panel movement. Tighten or replace any loose screws before applying sealant.
Apply silicone in a ring around the base of the screw head where it contacts the panel surface, covering the washer perimeter completely. Do not apply sealant only on top of the screw head – the penetration point is at the panel surface, not at the top of the fastener.
Do not expose the sealant to rain or moisture during the cure period specified by the manufacturer – typically 24 to 48 hours for silicone. Partial cure reduces final bond strength and elasticity.
Re-sealing individual screw penetrations is a manageable DIY repair when the problem is limited to a small number of failed sealant points and the screws themselves are in good condition. Professional involvement is required when the fasteners or panels – not just the sealant – are the source of the problem.
DIY re-sealing is appropriate when the following conditions are all true: the number of affected screws is limited to a clearly defined area, the screws are tight and undamaged, the panel surface around each penetration is flat and undeformed, and the correct sealant product is available for the panel coating type.
Professional repair is required when screws are corroded, backed out across a large area, or were installed at incorrect spacing or angle. Applying fresh sealant over a corroded or improperly set fastener does not restore the structural seal – it delays the failure by one to two seasons at most.
Replacing sealant without identifying why the original sealant failed is also an incomplete repair. If the original failure was caused by using an incompatible product – for example, applying acrylic over a Kynar-coated panel in a cold climate – the same failure will repeat on the same schedule regardless of how carefully the new sealant is applied.
American Quality Remodeling provides metal roofing inspection, fastener assessment, and repair services across New Jersey and Pennsylvania. For roofs where screw penetration failures are widespread or recurring, contact our team for a professional evaluation and a free estimate.


Embark On Your Build With Us!
we will be in touch with you soon
